Our order taking app can be connected to multiple Epson and Star thermal printers.
Thermal printers are widely used in restaurants. They are robust, fast, require no toner change and paper costs are close to nothing. Epson and Star are leading manufacturers in this segment.
The app supports three types of printer connection:
- LAN (Ethernet) – the thermal printer is connected by network cable to a WiFi router and accesses the same WiFi network as the order taking device does;
- WLAN (WiFi) – the thermal printer connects wirelessly to the same WiFi network that’s used by the order taking device;
- Bluetooth – the thermal printer connects directly to the order taking device via Bluetooth.
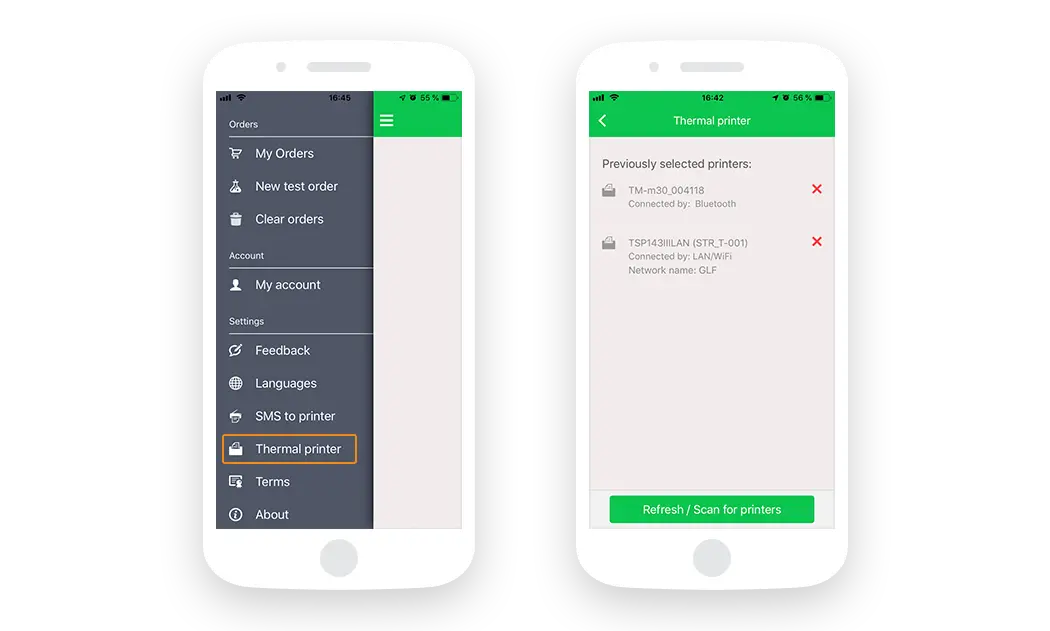
To add a printer, open the order taking app and select Thermal printer from the menu. The app will guide you through adding a LAN, WiFi or Bluetooth printer.
- When adding a LAN / WiFi printer, double check that the printer and your order taking device are connected to the same network.
- When adding a Bluetooth printer, first pair the printer with the device ( pair bluetooth on device first) and then add the printer in the app.
In case you have multiple working stations, you can add more printers and have your orders printed on all of them.

Furthermore, you can go in the Admin Panel and decide exactly what to be printed on each printer. You can have different templates, different number of copies and even different languages.

Restaurant receipt templates
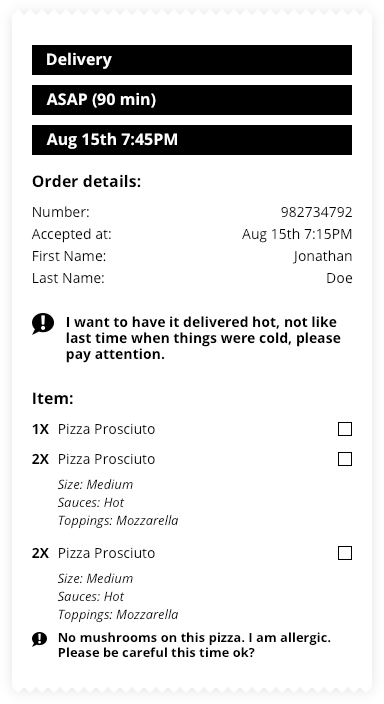
In the Admin you can find 2 restaurant receipt templates that we’ve prepared for you, suggestively called Client receipt and Kitchen essentials.
The Client receipt template contains:
- The payment method chosen by the customer (cash, credit card etc);
- Time to deliver/pick-up the order;
- Estimated drive time and directions (for delivery orders);
- Client’s contact info;
- The order details (including items, prices, taxes and total);
- Confirmation box for client’s signature at handout.

The Kitchen essentials template contains:
- Order type (delivery, pickup or order ahead for dine-in);
- Client’s name and comments;
- Full order details (the items ordered with their according customizations, quantities and comments);
- Quality control box for the final check at the packing station.

Note: You need a printer with image printing capabilities in order to use these templates. If your printer can only print text, you can still get the order printed, but in a default plain-text template.
How to customize the restaurant receipt
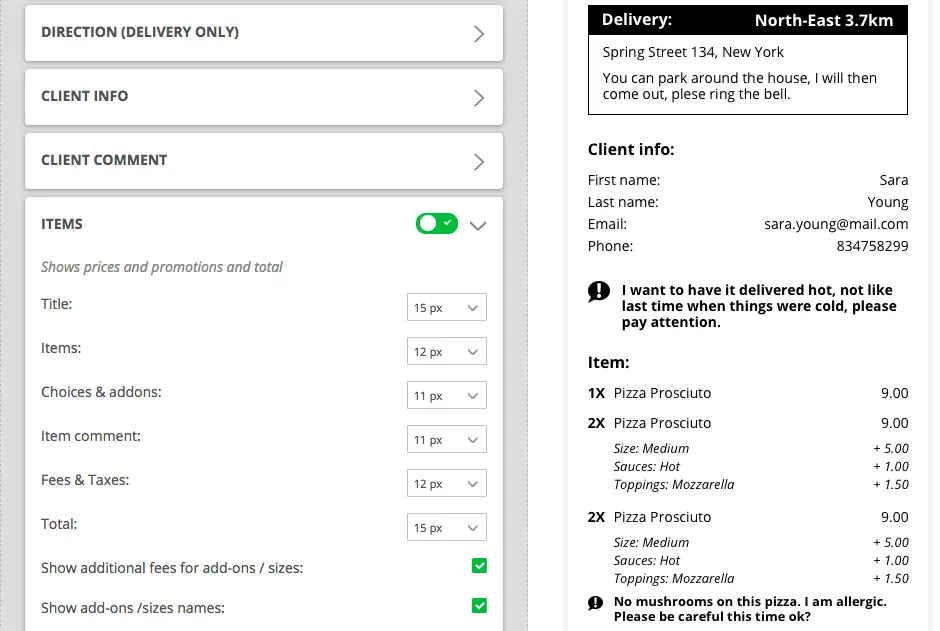
To customize your receipts, start from one of these templates and use the restaurant receipt generator to make adjustments as you see fit. You can:
- Change font size for every single line on the receipt;
- Rearrange the sections with simple drag & drop;
- Remove sections that you don’t need;
- Add your own content by using the text-free sections

The best part is that while you make all these changes you can see a real time preview of how your restaurant receipt looks like.
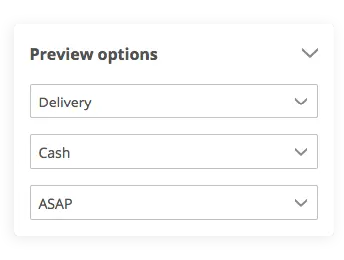
You can even generate previews for different real life situation by playing with the order type (delivery, pickup, order ahead), payment method (cash, card online etc) or fulfillment time (asap or later). That’s how you make sure that everything looks exactly how you need without having to print tones of test orders.

Note: If your printer can only print text (not also images), the receipt comes out in a plain-text format that you cannot customize.
Recommended printers
We’ve looked at the most popular printers used by our clients and picked the ones that perform best. All the printers below are reliable, easy to install and support image printing. Moreover, we have them in our office for testing and are the first ones we debug in case of issues. So if you want to buy a thermal printer to connect to the order taking app, we highly recommend one from this list.
When buying a printer, pay close attention to its characteristics, as the name alone can be deceiving. There are several models under the same name, and usually they differ only by color and interface (how they are able to connect).
For example, EPSON TM-T20II is a series with 2 models. You need to buy the one with Ethernet, if you wish to connect it to the order taking app. The USB + Serial model would be completely useless.
RECOMMENDED
| Printer | CONNECTIVITY | IMAGE PRINTING |
|---|---|---|
| EPSON TM-T20IIModel: Ethernet | Ethernet | |
| EPSON TM-T82 | Ethernet | |
| EPSON TM-T82II | Ethernet, WiFi with dongle | |
| EPSON TM-T88V | Ethernet, WiFi | |
| STAR TSP143IIIModels: Ethernet (LAN) or Wi-Fi (WLAN) | Ethernet / WiFi | |
| STAR TSP654Model: Ethernet (LAN) | Ethernet |
Other supported printers
These printers work ok and we actively support them as well:
- EPSON TM-m30, models: Ethernet only, Ethernet + Bluetooth, Ethernet + WiFi
- EPSON TM-T20, model: Ethernet
- EPSON TM-T70II, model: USB + Ethernet, USB + WiFi
- EPSON TM-T88IV, model: USB + Ethernet
- EPSON TM-T88VI, all models have Ethernet built-in and WiFi with dongle
- START SP143
Why we don’t recommend Bluetooth
Although the order taking app allows you to connect a thermal printer via Bluetooth, we don’t recommend it. Here’s why:
- Discovering the printer via Bluetooth is often times rather difficult. Also, for many printers, once the connection is lost, it cannot be re-established automatically;
- Bluetooth has a range of maximum 10 meters and is prone to interferences from other EM waves (like microwave oven or some WiFi networks);
- We have encountered size limitations with printers from different manufacturers (like Star TSP650II).
